Well, maybe it's not all that dramatic.
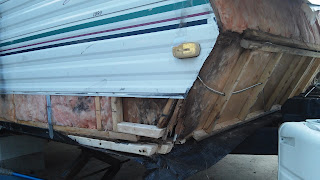
This is from our second trip with the camper, last winter, and it is starting to sink down. At this point it didn't seem too serious, and I wasn't watching that closely in the mirror. It got a little worse during the summer trip, and the corner trim kept coming loose at the bottom.
Now, close to 10,000 miles later, it's down more in the front. Or really, the frame is coming up at the front.
The main frame rails are about 15 inches in from the outer wall, with ears on the frame sticking out to support the walls. The old caulk along the corner trim was hard and inelastic, allowing some water to get in to the wood, and down to the base of the corner.
Laying on the frame are: plastic tarp 'weather proof' sheet, 2x2 lumber and 3/4 plywood decking, then the 2x2 frame walls. The 2x2 floor and plywood decking were rotted just in the first foot or two, a little more so on the left side where the water pump is located.
Note the divot on the front kneewall hitting the front of the frame, and notching out the siding. The front kneewall does not sit on the floor or carry any weight, it more hangs between the side walls. So the notch shows how much the corners are bouncing down over the frame, as much as 2 inches.
 |
| Elliot scraping off the old corner trim caulk. |
Some will say that traditional construction el-cheapo wood framed with aluminum siding camper construction is not classy or solid enough. But being able to fix it easily is a great feature, even if we can't get into one of those high dollar campgrounds that require a late model class A's. There we go, we're riff-raff, keep us out!
Remove the corner trim strips. Remove the front lower section of siding on each side, cutting it inconspicuously below a door or hatch. Remove the lowest front section, and roll up the next higher front section too.
We supported the frame on blocks a little further back from the front of the trailer, where the next frame ear sticks out. Once supported there, releasing the tongue jack and front leveling jacks, the front of the frame dropped back down to it's original location relative to the wooden camper body.
Remove the rotted wood framing back to solid wood. Weave and stich in new framing.
Inboard of the outer floor frame 2x2, I inserted a 7 foot long 2x2 all the way back to the next frame ear, sistered to the original with big screws. Now this wood frame construction does have one limitation; the half dozen 2x2's and some 1x2's did set me back a substantial almost 15 bucks.
The finishing washers are worth using with the deck screws to avoid splitting, and I did get to use those nice 4 inch roofing screws from home. (Thanks Dad).
Where the floor deck plywood was gone, I used 1x2 pieces slid in between the new 2x2 floor frame and the wall framing.
 |
| A 5/16" bolt from the bottom and a tee nut in the frame, similar to the original carriage bolt at each ear on the frame, holding the floor to the frame. |
 |
| Just about ready for insulation and closing back up. |
Put back the fiberglass insulation, close up the siding, re-install and caulk the corner J-strip trim.
And here's the finished product. Don't go zooming in too close, this is an arms length job. But it looks reasonably clean and straight.
 |
| hey, where did the battery go? that's another story..... |


Holy macaroni, did you carry carpenter tools with you or did you do a raid on a Home Depot? Next stop: work as an RV technician!
ReplyDeleteHi Peter & Bea,
ReplyDeleteMostly just a handsaw that I brought and cordless drill & drivers. But staying with family, I borrowed a jigsaw also. For the next project I made a lot of use of a dremel.
Well done! You have done the job in a very good manner. Otherwise it is not easily manage able. For roofing problems Roof Leaks Repair Connecticut has given ease otherwise it was too difficult for me to do that laborious work.
ReplyDelete