When Mr. Spock begins behaving aggressively, Kirk discovers his first officer must return home to Vulcan to be married, or die. Kirk disobeys his orders to save Spock, only to find the unbalanced Vulcan at his throat when the bride forces Spock into a duel – and chooses the captain as her champion.[3]
So here we go on our next big trip. We had everything packed up, ourselves moved out of the house and slept in the driveway to get an early start.
 |
| It's really pretty out this early in the morning. Glad we got up so early. |
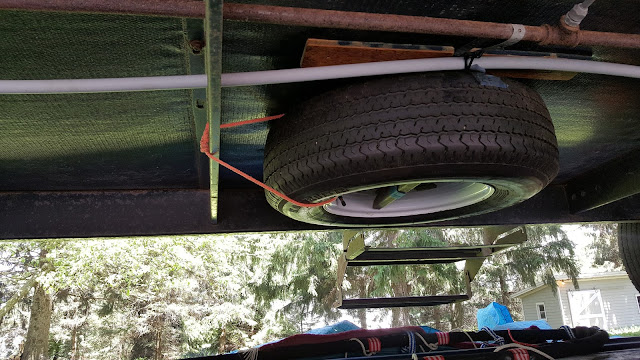
The trailer spare is mounted up under the trailer, instead of having it kicking around the truck bed or breaking off the rear bumper. It hangs from a winch strap on the floor under the couch.
The trailer brakes had been acting funny near the end of the last trip, and I didn't like how they were wired. The scotch lock connectors get corroded, the wire through the axles shorts out eventually, and the length to each brake coil is not equal wired the trailer brakes. The front axle through wire had shorted out in the past, and I found the rear axle wire looked suspicious now. I ran a 1/2 inch PVC conduit down the center of the trailer, which fits perfectly through existing holes in the frame. From the rear junction box, wire goes out to each wheel, and connects with nice waterproof-ish shrink wrap butt splices. (From Skycraft in Orlando, so we need to make another stop there!)
Wow, how could that be, they worked before.... They would hold initially at a stop a little bit, but once moving they wouldn't do much. So I jacked up each one and adjusted the star wheel, and pulled the breakaway connector to test that each one worked individually. They all seemed to work...
Test again with truck back and forth in the driveway and still Not working brakes.... Hmmm. Checked the resistance of the brake circuit from the front of the trailer, seemed about right. Hmmm.. One of the adjusters didn't need to be turned as much as the others, maybe that coil was shorted out? We jacked that wheel off the ground and measured the resistance, while Elliot turned the wheel. Ahaha! The resistance changed when that wheel was turned, that coil was shorting out to the drum.
With the new wiring, nice good connections all equal length to the main wire, one coil shorting out takes down the voltage equally to the other coils. With the old wiring, the main wire to the brakes had been down the left side, and then across the axle to the right side. A short on the right side doesn't lower the voltage as much on the other 3 wheels. A short on the left side would take down all four brakes.
So the short term solution was to disconnect that brake in the rear junction box. The brakes work pretty well with the other three, and I ordered all four next brake assemblies. Only $57 per axle for complete new shoes, backing plates, coil, etc, all together. We'll put those on at Grandpop's house.
Funny that what I'd think is a better, more robust wiring setup is actually worse. Maybe adding a large resistor in series with each coil, in the rear junction box would make it more robust to shorts.
Another satisfying little project finally got done Thursday night. Literally years in saying gee I should fix that somehow, and less than an hour once the materials gathered together on the workbench at home. Ingredients of said fun have been kicking around the garage for years: 4 small pot metal castings from Walmart bike brakes, a rod with a circlip from an old mimeograph machine, 2 blind clip nuts. What can we do with these?
 |
| After: clip nuts firmly hold to the fins, circlip holds the rod from left to right, and the fans hang from the rod but can be moved left & right to defrost the fins. |
 |
| Before: wood stick, twist ties |
Well, those are the fun camper projects so far. The next week or two we'll visit family in NY, do some more camper projects, and then we'll see where we go next, East or West....


